In this article, I'll list tips for making LaTeX documents better and easing collaboration.
The target audience of this article is academic researchers who write math-heavy papers using LaTeX. I don't want to offer tips that are either obvious or irrelevant, so most of these tips are either based on subtle 'mistakes' by other researchers and students, mistakes by me pointed out by my collaborators (thanks!), or are tricks I discovered/invented to ease collaboration.
General TeX and LaTeX best practices
Always include hyperref
Always \usepackage{hyperref} in your document.
It won't affect what your document looks like when you print it on paper,
but it will improve the digital reading experience,
like making references clickable and adding a table of contents.
The order in which you load packages matters.
Most packages should be loaded before hyperref[1]
(cleveref, algorithm, and algpseudocode are the only exceptions I'm aware of).
You can pass several options to hyperref either while loading the package
(usepackage[options]{hyperref}) or later (\hypersetup{options}).
Some useful options:
bookmarksnumbered=true: Table of contents entries will be numbered.hypertexnames=false: To work around hyperref-related bugs in some packages. Example: https://tex.stackexchange.com/a/670742.hidelinksandcolorlinks:hyperref's default behavior is to box links. Instead, if you want to color the links, usecolorlinks. If you want to neither box nor color links, usehidelinks.linkcolor,citecolor,urlcolor: specify colors to use for internal links, citations, and URLs, respectively.
I used the following options in my old ArXiv papers (the options I use now are a little more complicated):
\hypersetup{bookmarksnumbered=true,colorlinks,linkcolor=red,citecolor=red,urlcolor=blue}
Use cleveref or autoref
Instead of \ref, use \cref from the cleveref package,
or use \autoref from the hyperref package.
cleveref allows you to write \cref{lower-bound} instead of Theorem \ref{lower-bound},
because cleveref automatically detects which kind of thing you're referring to.
If you ever decide to change a theorem to a lemma,
you won't have to find and replace every Theorem \ref{lower-bound} to Lemma \ref{lower-bound}.
Official documentation: CTAN:cleveref.
Useful options you may want to check out: capitalize, sort.
Load cleveref after hyperref.
Name your references such that it's possible to know what kind of thing it is:
theorem, definition, section, figure, etc.
Preferably do this by using a prefix: thm:, defn:, sec:, fig:, etc.
(e.g., \label{thm:lower-bound} instead of \label{lower-bound}).
This makes it easier to know what is being referenced when reading the TeX source.
Don't use different prefixes for theorems, lemmas, observations, claims;
use thm: for all of them (otherwise there's no point in using cleveref).
\autoref is almost the same as \cref.
These are the main differences that I found:
- In
\crefwe can pass multiple comma-separated labels, e.g.,\cref{thm:lower-bound,thm:upper-bound}outputs 'Theorems 1 and 2' (or 'Theorem 1 and Lemma 2', ifthm:upper-boundis a Lemma).\autorefdoesn't support this. - Capitalization can be controlled in
cleverefusing thecapitalizeoption or the\Crefcommand. With\autoref, some entities are capitalized and some are not. The defaults can be overriden by defining\<entity>autorefname-style commands (see section 6 of the hyperref manual for details).
Do not use obsolete commands
l2tabuen.pdf lists obsolete commands and their newer alternatives. These are the most important ones:
- Use
\[ … \]instead of$$ … $$. - Use
\fracinstead of\over.
Don't repeat yourself
If you ever find yourself writing the same paragraph/theorem/definition twice, it means you're repeating yourself. Repetition is bad and should be avoided, because
- You'll have to keep the copies in sync. If you make a change at one place and forget to make it at other places, the copies will become inconsistent.
- Why would you say something that you've already said?
But sometimes there may be a good reason to repeat yourself. Perhaps you're writing a long document and the reader may have forgotten things you said earlier. But even then, there are ways of repeating yourself where you just say something once in your TeX document and have it automatically appear at multiple places in your PDF document. This would save you from accidentally creating inconsistent copies.
- To restate theorems, definitions, examples, etc.,
use the
restatableenvironment from thethm-restatepackage. For more details, see https://tex.stackexchange.com/q/51286 or Section 1.4 of thmtools-manual.pdf. - Define a piece of text as a macro and then call it multiple times.
- Write something in a file and
\inputthat file at multiple places.
Handle the warnings
Please read the warnings that are generated by TeX/LaTeX. Most of them indicate something wrong with your document.
Overleaf has a pretty interface that extracts warnings from
the large amount of garbage that TeX outputs on stdout.
If you're using TeX on your own computer via the command line,
you may want to use an external tool to extract warnings.
I made one such tool: github:sharmaeklavya2/tex-filter.
If you feel that a warning is a 'false alarm', then try to hide/suppress that warning. Otherwise the output is so full of false warnings that useful warnings are hard to spot.
Supply alt-text in section titles
If you \usepackage{hyperref}, then your PDF reader will show a table of contents.
However, this table can only contain simple text, not mathematical expressions.
Here's a screenshot of what happens if we include math in section titles.
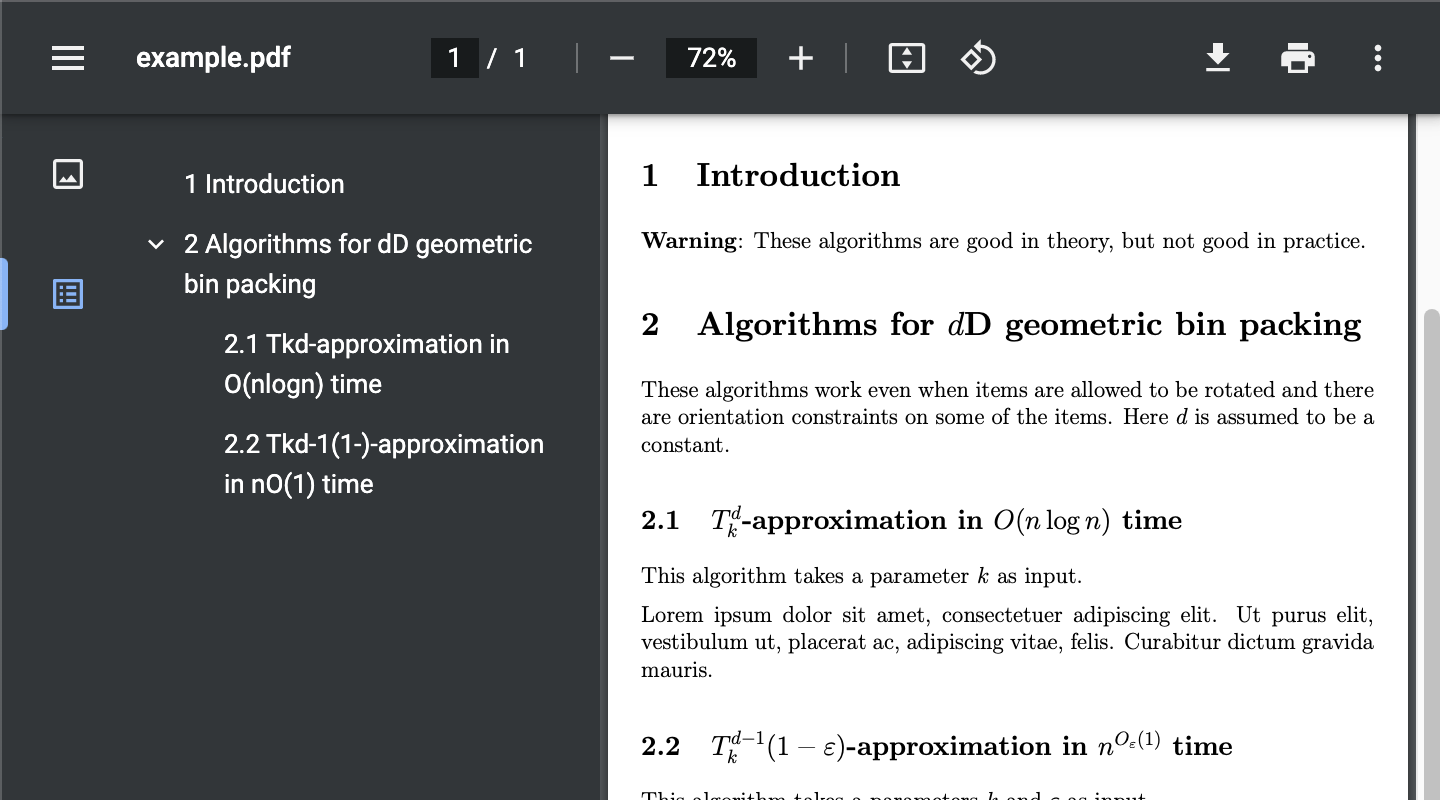
For this reason, LaTeX issues a warning whenever math is included in section titles.
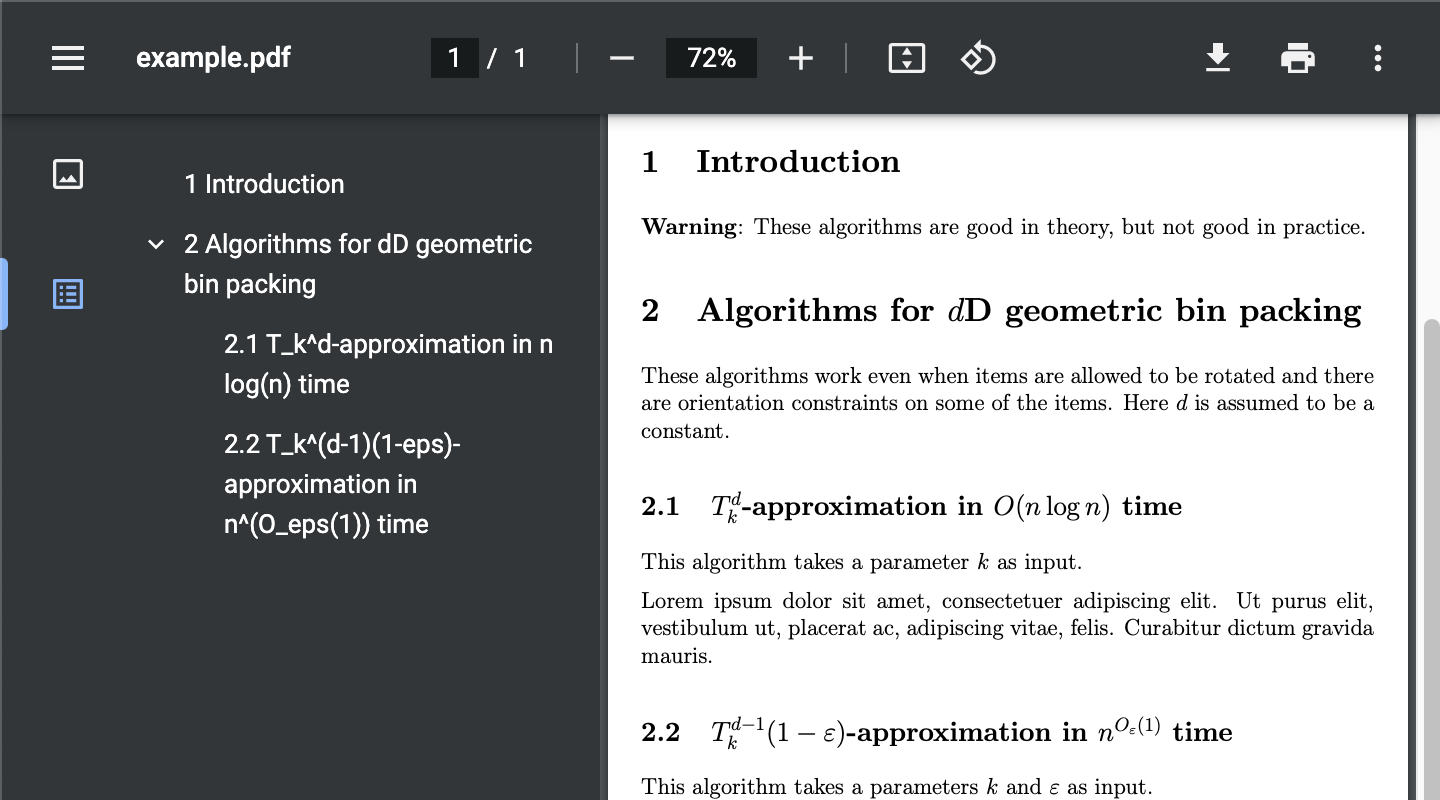
To fix this, supply alternative plain text for titles using \texorpdfstring.
For example, change
\subsection{$T_k^{d-1}(1-\eps)$-approximation in $n^{O_{\eps}(1)}$ time}
to
\subsection{\texorpdfstring{$T_k^{d-1}(1-\eps)$}{T\_k\^{}(d-1)(1-eps)}-approximation
in \texorpdfstring{$n^{O_{\eps}(1)}$}{n\^{}(O\_eps(1))} time}
Multi-file projects and makefile
Suppose your document is split into multiple files, where the top-level file is called main.tex,
and you \input other files in main.tex. When you use pdflatex to compile main.tex,
the output will be named main.pdf.
If you use this naming scheme for all your documents, they will all be named main.pdf.
This may be a problem, depending on how you navigate your filesystem.
There are 2 ways of fixing this:
-
Change the output name: Suppose you want your document to be named
number-theory.pdf. Then instead of runningpdflatex main.texrun
pdflatex -jobname=number-theory main.tex -
Change the input name: Name the top-level document
number-theory.texinstead ofmain.tex. But this can make it hard for others (or you, after a long time) to figure out which is the top-level TeX file.
For both the options above, I recommend having a file named makefile in your project,
where you specify the compilation instructions. Thus, you not only document
the compilation instructions, but you can also quickly compile the project
by running make
(if you're using a Unix-like system).
Here's an example makefile:
INAME = main
ONAME = number-theory
default:
    pdflatex -jobname=$(ONAME) $(INAME).tex
    bibtex $(ONAME).aux
    pdflatex -jobname=$(ONAME) $(INAME).tex
    pdflatex -jobname=$(ONAME) $(INAME).tex
If you just want to see the commands and not run them, run make --dry-run.
For the above example, the output will be
pdflatex -jobname=number-theory main.tex
bibtex number-theory.aux
pdflatex -jobname=number-theory main.tex
pdflatex -jobname=number-theory main.tex
You can also add other commands to the makefile. For example, if you append
clean:
    rm -f *.{aux,bbl,blg,log,out,toc}
to the makefile, then you can delete all intermediate files by running make clean.
Tips for writing papers for submission
Publishers often have some requirements about the submission, like the way metadata is formatted, page limit, constraints on the TeX source, bibliography format, etc. Hence, authors need to make changes to their paper before submission. This issue is exacerbated if the authors get one or more rejections and they resubmit elsewhere, or they are also submitting to arXiv.
To make this just-before-submission process easier, I formulated some best practices and wrote programs to automate a few tasks.
Splitting a document into multiple TeX files
A common practice is to split a LaTeX document into multiple files.
There is a file for each section, and they are all \input into a main file (usually named main.tex).
Some people, including me, like this approach for various reasons.
One disadvantage of such a splitting is that publishers often ask for a single TeX file. Then we need to copy-and-paste everything into a single file. But this need not be a deterrent, because I automated this process: github:sharmaeklavya2/tex-flatten.
Different versions of a paper
(e.g., arXiv version, conference version, journal version)
have different ways of specifying metadata,
like title, abstract, authors, their affiliations, etc.
They may even even use different \documentclasses.
However, the technical content is mostly the same.
To make it convenient to switch formats,
it's best to separate the venue-specific information from venue-independent information.
I usually do this by having different files for each venue/format,
like main.tex, main-lipics.tex, main-snjnl.tex, etc.
Each of these files only contain the venue-specific information,
and I \input the venue-independent information, like
the tex files for each section, macros, abstract, etc. in the main file.
By invoking pdflatex on each main document, I can get a PDF for every format.
Easily convert abstract to plain text
Publishers often ask for a plain-text version of the abstract.
If the abstract contains mathematical expressions or citations, they would need to be changed.
I don't like to manually do this editing before each submission.
So I wrote a tool (github:sharmaeklavya2/tex2text)
to automatically do this conversion for me. To do this,
I put my abstract in a separate file (like abstract.tex) and \input it into my document.
My tool reads abstract.tex and outputs a plain text version by replacing LaTeX macros
by unicode/ascii characters.
Collaboration
People often have different preferences about how to write documents and collaborate. To accommodate others' preferences, one needs to know how to handle conventions different from what one is used to.
Long lines
TeX joins consecutive non-empty lines by a space. So if your TeX code looks like this:
This is the first paragraph.
It has 2 sentences.

This is the
second paragraph
with just a
single sentence.
Its output will look like this:
This is the first paragraph. It has 2 sentences.
This is the second paragraph with just a single sentence.
Some people, like me, prefer breaking up long lines in the TeX code into shorter lines (usually at most 80 to 100 characters long). This is called hard-wrapping. This is useful for multiple reasons:
- Git tracks files line-by-line. If you or your collaborators use git, you'll be more likely to get merge conflicts if your files have very long lines.
- To iterate over sentences in a paragraph, one usually needs to scan the paragraph for periods. However, I break lines such that sentences usually begin at the beginning of lines. Hence, I can iterate over sentences by just reading the first few characters of each line.
- Longer lines make it harder to use a diff tool (like
git diff) to see what has changed between versions of a file.
I recommend hard-wrapping. But as far as I know, most people don't hard wrap lines. They may agree to hard wrap and then keep forgetting to do so. Also, it can be irritating to edit TeX code that is hard-wrapped at a width larger than the editor window width, and Overleaf has a very narrow editor window. Hence, one needs to know how to deal with extremely long lines.
- Use a diff tool that highlights intra-line diffs,
like
deltaordiffr. See https://stackoverflow.com/q/49278577/ for more info. - If you're using Vim, then prefixing
gto navigation commands (i.e., changingh,j,k,ltogh,gj,gk,gl) make them move by screen lines instead of source lines.
Trailing whitespace
Trailing whitespace is when a line of text ends with a space,
or when a file ends with multiple newline characters.
Avoid trailing whitespaces.
git diff and some text editors mark them as warnings.
Online collaboration tools
Overleaf
Overleaf is an online editor that allows multiple people to edit a LaTeX document simultaneously. My initial impression of Overleaf (sometime in 2019) was bad, since it was slow and hard to use with a bad internet connection. It may have improved now, but I haven't tried its web interface.
Overleaf's best feature, in my opinion, is the ability to pull and push via a git interface. This way, I can just use my own text editor (vim) to edit files. This is a premium feature, unfortunately.
Git
Git is a tool for collaborative version control. It was written so that a large number of people can work on a large software project at the same time. Git is also useful for non-software projects, though, like LaTeX documents.
Git has a steep learning curve. (I used to be a professional software engineer, so I'm quite comfortable with git.) What makes learning git difficult isn't just getting used to the terminal commands. The real difficulty lies in realizing what git can do for you. If you think of git as just an interface to sync a folder to Github, you're missing the point, and won't be able to appreciate the utility of git. (TODO: add list of resources to learn about git.)
For multiple people to work on a shared git repository, it needs to be hosted online. Github and Gitlab are viable hosting options.
Shared online folder
A shared online folder (like Dropbox or Box) is, in my opinion, a quick-and-dirty way of collaboration. With auto-syncing in Dropbox, authors need to be careful about concurrent access. Dropbox saves past versions, but the kind of versioning it does is very rudimentary (especially compared to git). Dropbox sends notifications to collaborators whenever someone makes a change. If someone has a habit of constantly saving their work, collaborators get flooded with notifications (except if they turn off those notifications entirely).
When my collaborators use Dropbox, I treat it like a git remote.
I have a local git repository outside Dropbox.
Each time I need to edit the document, I use rsync to copy
the shared Dropbox folder into my working directory, and then I commit those changes.
Then I continue working on my git repository as usual.
When I need to push, I use rsync to copy my working directory to the shared Dropbox folder
(I first check diffs to ensure that I'm not overwriting others' work).
This way, I partially get the benefits of git and my collaborators don't even need to know about it.
Acknowlegements
- Prof. Arindam Khan, my masters advisor, told me about cleveref.
- Robert Andrews told me about
\autoref.